Thursday, March 29, 2012

AW11 MR2 build - "Akemi" Part 20

2/12/12
my new 2000-2002 MR2 Spyder wheels. 15x6, 15x6.5 +45 weighing in at around 15lbs

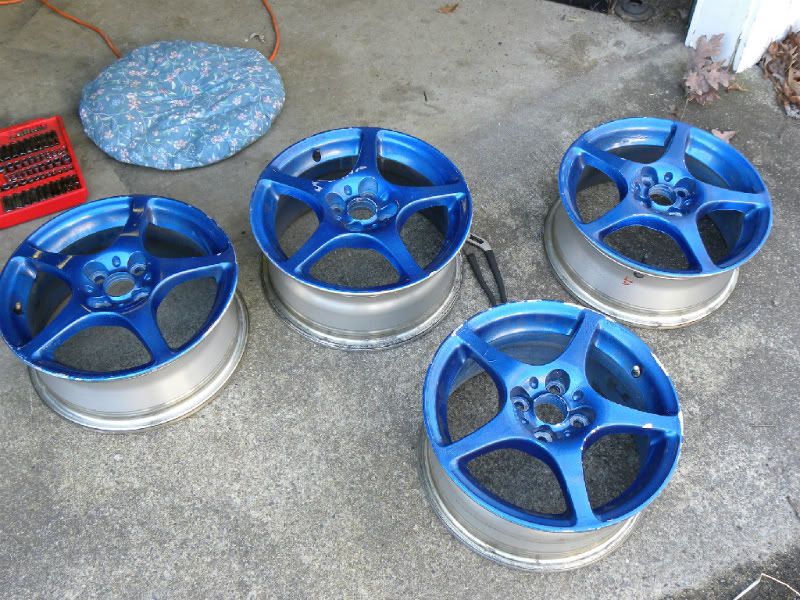
I tried using paint stripper to get the paint off but it didn't work that well. I may try to give it another go, but otherwise I'm gonna see how much sand blasting costs. Then they will be painted bronze and become my daily driver wheels with 195's up front and 205's out back

2/25/12
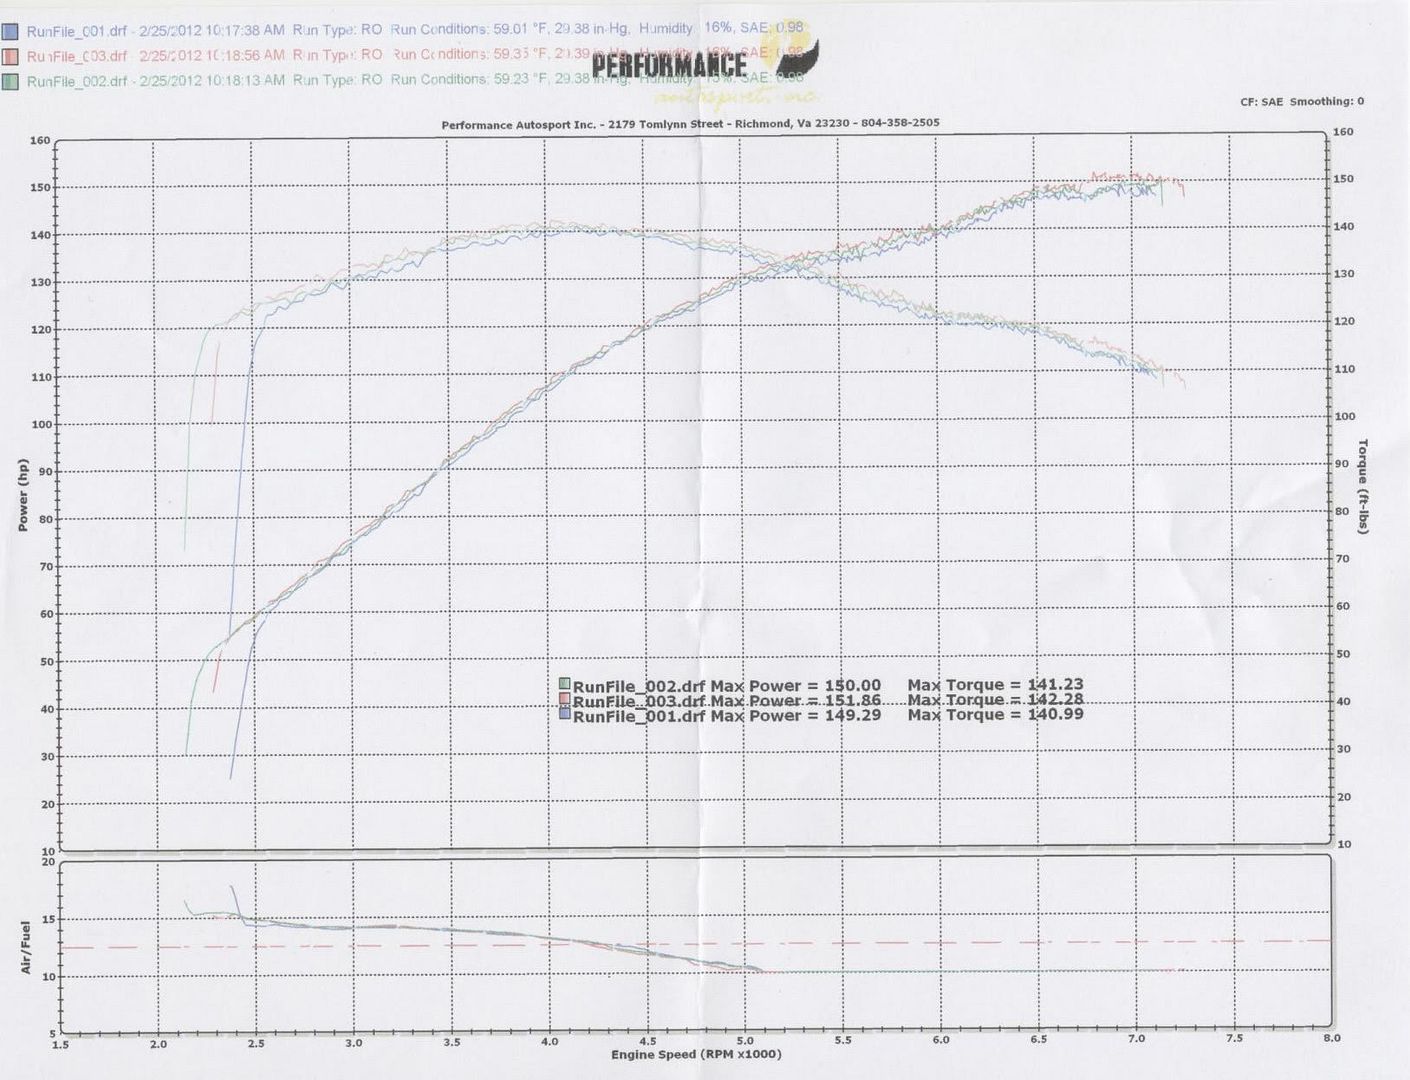
broke 150 rwhp! WOOT. That's like....165 crank

gotta do something about that low end lean out....gruntbox will happen one day. Tires first.

2/26/12
Actually doing the math...Shannon's car has around 15% drivetrain loss from stock power levels. Assuming mine is similar, that puts my crank power at around 177

also video
https://vimeo.com/37454961

2/28/12
Got one wheel 99.99% stripped back to bare aluminum. I still have a few little minor things to touch up, but it's basically done. Now for the other 3...
after that it's hand-sand with high grit sandpaper to make sure the wire wheel didn't leave it TOO scratchy, then acetone wipe, adhesion promoter, primer, paint, then maybe clear.

3/2/12
did a bunch of random stuff today.

got etching primer and adhesion promoter. also talked to the guy at the paint shop about what kinds of paint to use. they have a really cool cheap alternative to spray cans that I may end up using.

a oem size miata battery fits PERFECTLY in the frunk with room for the spare tire. This summer probably will see a battery relocation.

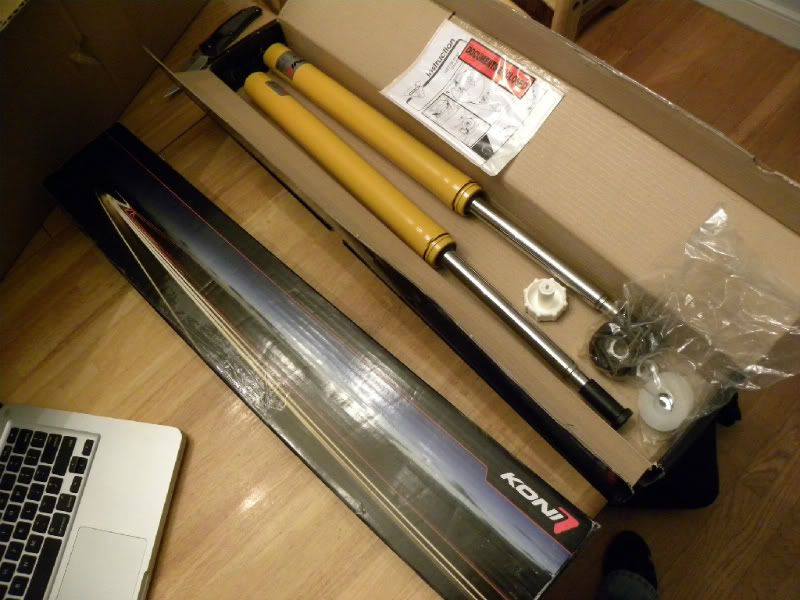
twosrus is having an EPIC sale on Koni Yellow's. normally $350/pair, now $280/pair. I may just buy these tonight.....

yeah....just bought koni yellows....most expensive mod I've done yet I do believe. So excited.

3/6/12

3/8/12
Front Koni's are in :)

2/13/12
found an AC recharge kit in the garage and decided to see if the fittings matched (to see if my ac had been converted) and it has, so I started recharging it, until I heard/saw that it is leaking out as fast as I can put it in >.<

also cleaned out my interior today.

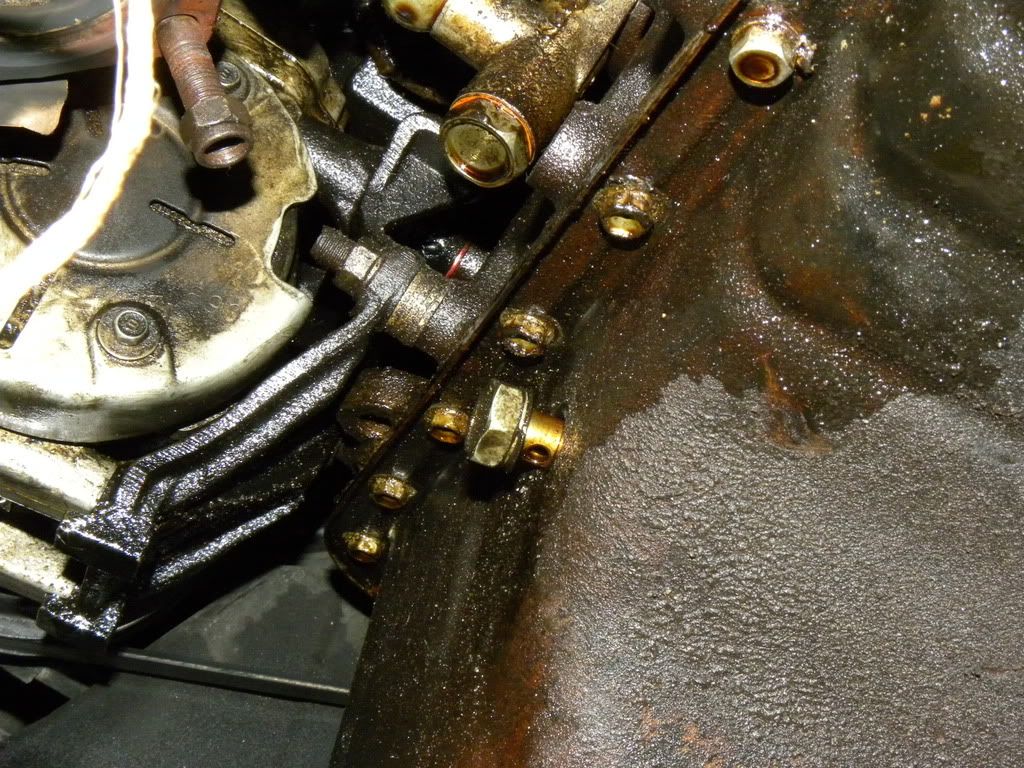
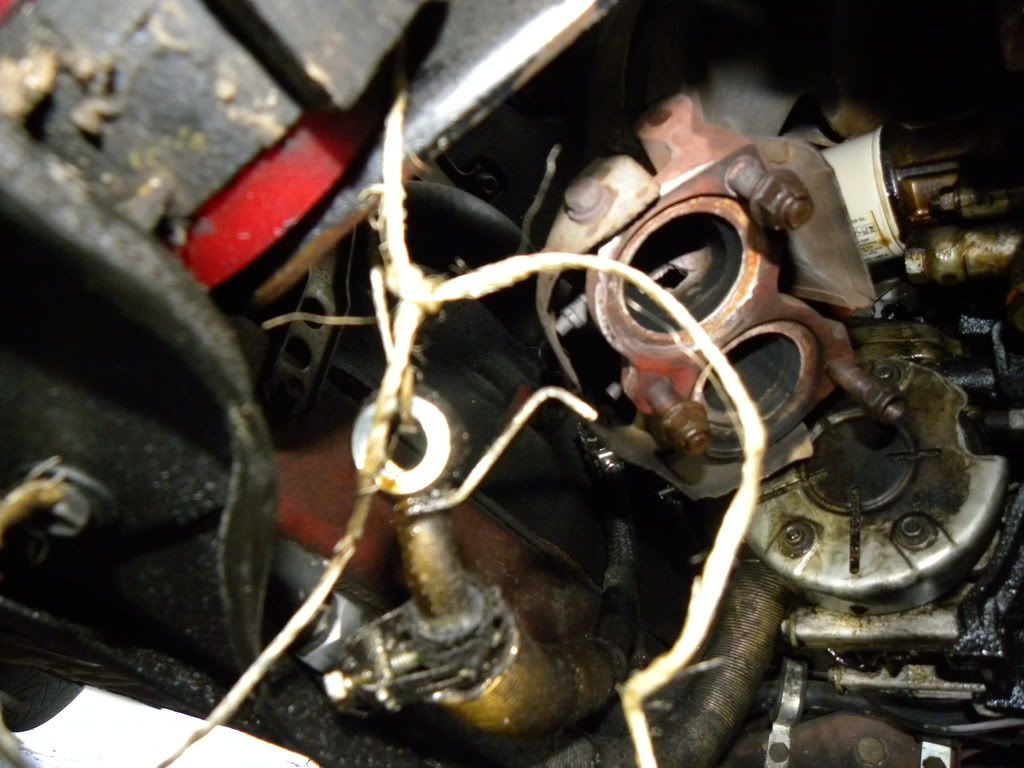
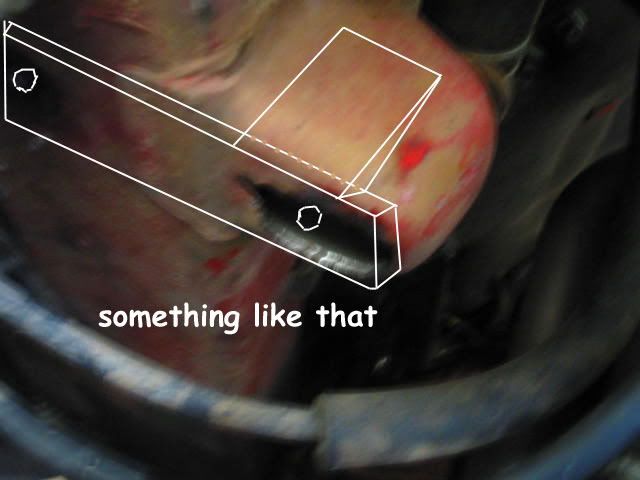
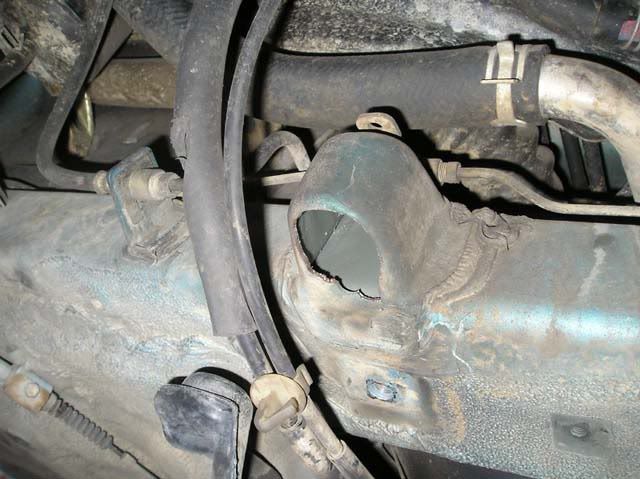
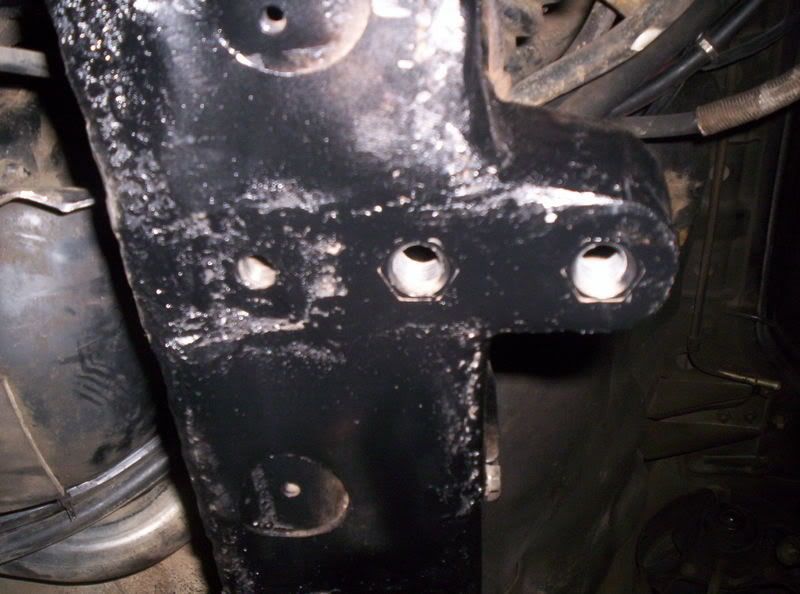
the run from the compressor, up under the car (I THINK under the fuel tank, so not hard to get to), up to the condenser at the front and back again. The leak is happening somewhere near where the hardlines end/flex lines start at the engine bay firewall area.

3/15/12
Fixed the AC leak (I think) and re-recharged it. Also changed the accessory belts and fixed the fog lights.

future reference:
SC/water pump belt = duralast #375K5
alt/AC belt = dayco #5050405 (small # is 5PK1030)

3/23/12
PRIMER'D!

PAINT'D!!!

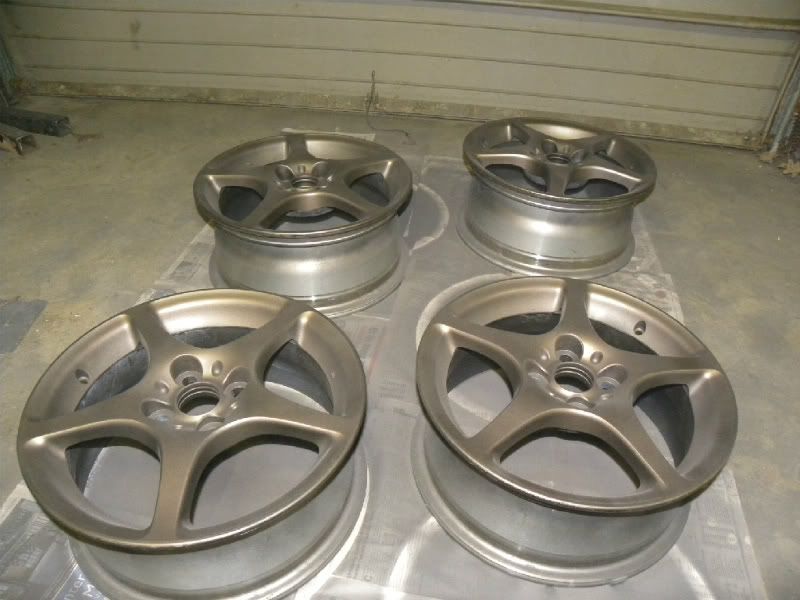
pay no attention to the HORRID lighting. they look FANTASTIC. I'll probably work with Pierce some time next week to get tires put on (maybe Friday or something)

3/23/12
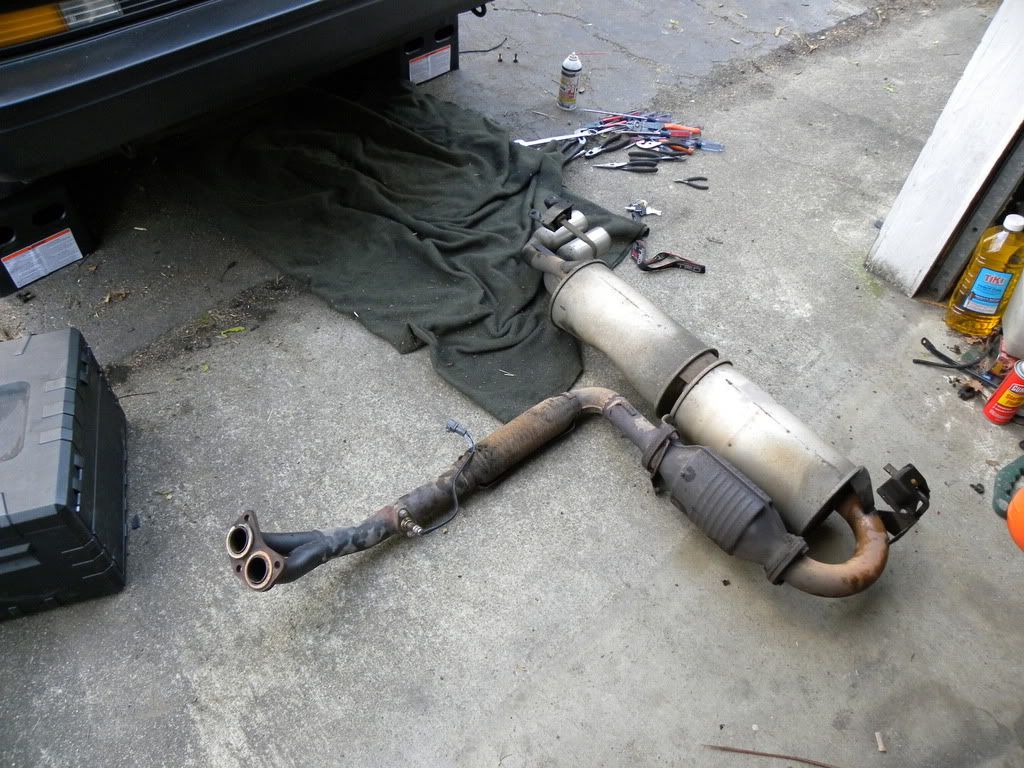
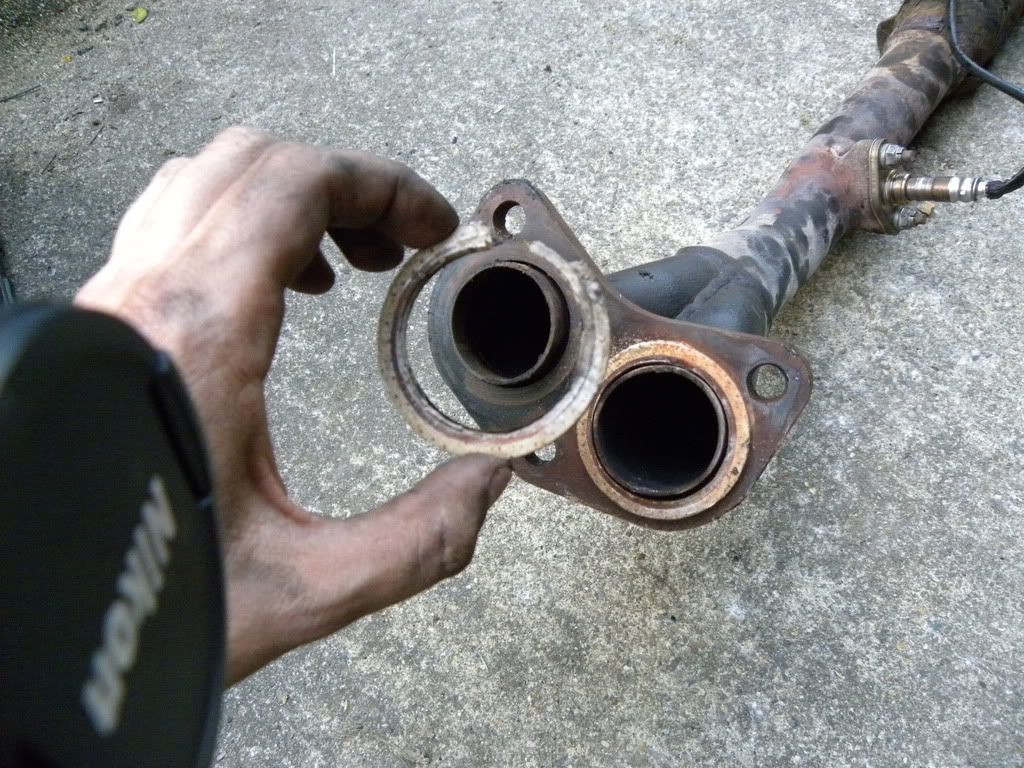
currently trying to see my options for exhausts. HKS is probably not gonna be able to come in, so I may have to get something fabbed :(

3/27/12
new lug nuts are here. all I need now is to get the tires mounted/balanced (also needs valve-stems).

also ordered the last oem muffler in North America. I'll use that till the HKS comes in at some point in the next decade, then probably just sell it at a mild loss.

AW11 MR2 build - "Akemi" Part 19

8/31/11
so yesterday i took care of a few little things that have been annoying me
1. took apart the trunk lock and made it work. first time i've ever been able to use my key to open my trunk
2. fixed the rattle from the c-pillar trim with a rubber plumbing washer
3. replaced a missing bolt from my front underbody brace

and then i went to re-mount my front wheels (gotta wiggle em while tightening lug nuts to make sure its centered) and because the alignment guy used an impact gun to put them on (BIG NO NO) the lug key tool snapped. had to use pierces tool again to remove ALL of my lug nuts and had to go to advance and get the same shitty horrible chrome ones corey has (no offense dude but those lugs suck BALLS). i now have CHROME...on my CAR.......sweet jesus that sucks. selling my 949's to Garett today and hopefully going by RPM and picking up some NICE lugs that will fit tomorrow.

9/19/11
changed oil today. used some off the shelf oil flush too. didnt really see a huge difference, but my engine is super clean inside anyway so I wasnt really expecting much.

11/27/11
Symptom:
When I turn the headlights on (or try to flash the brights), the lights pop up, but do not turn on. Instead, the relay in the frunk sounds like a freaking buzzer, the volts drop down, dash lights dim, rpm needle goes up and wiggles around, dash hazard lights stay on.

Possibly related problem:
for a while now, my brights will only turn on when they feel like it. If I pulled the lever towards me they will flash, but if I try to push the lever away from me to turn them on, the lights will cut off completely (unless they decide to work sometimes). This was of course before the relay/dash started going crazy tonight.

any ideas?

11/28/11
OK so this is WAY worse than I thought. Here we go...
Yesterday I removed the headlight switch just so I wouldn't have to mess with it untill I got a new one...
So today I find that while the engine is ON,
1. turn signals blink REALLY fast and on the correct side, but the dash signal is the opposite side
2. wipers work, but when i press it in to use the washer jets, volt gauge drops to 0, dash turn signals come on
3. hazard switch drops volt gauge to 0, rpm gauge goes crazy, and something starts buzzing (like the headlights were doing before)
4. flashing brights pops up the lights, drops volts, crazy rpm gauge, both dash turn signal lights come on for as long as I hold the stalk towards me
5. pushing brights stalk away does nothing

While engine is OFF, ignition switch is at ON
1. turn signals work normally
2. hazards work normally
3. washer jets work normally
4. brights same problem as above

when I got home from class I left the car running, went upside down and looked under the dash again. There is a light blue plastic bracket thing that a billion plugs plug into just to the left of the clutch pedel. This was not bolted down super securely so I wiggled it a bit, and lo and behold everything worked again. I think I need to unplug that stuff and inspect it for any bare wires, scorch marks, etc. Also, I need to find a spare nut to secure it down.... I HOPE that's the problem.....


11/29/11
found some people that had the same problem. Not my pics, but my car was the same. keep in mind that this is all way up under the dash by the clutch pedal and is a MASSIVE pain in the ass to get to/work on/take apart

reinforced the burnt solder.


12/9/11
shoutout to Pierce for mounting/balancing my new tires. Also found out my good wheels are actually +40 offset, not 38. word.

1/2/12
Changed my oil today.
listed mileage was 244015
less correction (64214)
actual mileage 179,801

1/5/12
ordered new porterfield hp r4s pads. gonna try and pick up some rotors tomorrow.

1/12/12
Changed front brake discs (NAPA premium blanks) and pads (Porterfield HP R4S) on Tuesday night. Gonna flush brake fluid and clutch fluid on Saturday at the work day at Corey's, as well as install my new fuel filter (never changed it as long as I've owned the car, figure now is probably a good time). I'm looking forward to having a solid, responsive pedal at the Autocross on Sunday.

1/15/12
flushed the clutch (wasn't bad) and brakes (was REALLY bad) so now I have nice firm responsive pedals again. Also replaced my fuel filter, which was kindof a headache. Working in a garage with a nice smooth floor is FOR THE WIN

1/22/12
part of part of my wishlist is getting crossed off. Dude on the forum was selling a rear pair of Koni yellows for $200 and I snatched them up. He has an 86 and he got ones for 87+, so they are opened, but never installed. They cost $375/pair new. SO MUCH WIN

1/30/12
koni's came in. He advertised them as 87+ but the part number stamped in the shocks is definitely the 85-86 part number. The early struts are smaller diameter than the 87+. He said these wouldn't fit in his 86, but the part number says otherwise. Also, they seem to have a slight bulge in them which may be what gave him a hard time.....I'm SO pissed. I don't even know what to do. All I can do is wait for his PM response.

Also they didn't come with new shock collar nuts like they're supposed to.

2/5/12
Things I'm currently working out:
I may be trading my 3S-GTE head for a set of early model MR2 Spyder wheels. 15x6 front, 15x6.5 rear. These would become daily drivers with 195's up front and 205's out back, and the Nippon's would become race wheels. Only thing is that apparently the Spyder wheels have been painted blue??? so I'll be stripping those and either powder coating or painting them myself, probably bronze (like subi wheels)

Also, since Korey's new car is an 86, I may trade him my 85-86 koni's for his 89 koni's

2/7/12
about my new exhaust
Quote:
"Hello Jordan, sorry about the delay I just recieved work back from HKS Japan that it will be an additional 5-7 weeks before this one reaches the US. I have tried looking everywhere to source one of these systems for you but there are just none available in the US. I appologize for the extended delay. Let me know if you would like to keep it on order still since you are needing an exhaust sooner than later. Thank you for your patience, Russ."


BLARG. As long as it's here by May so I can pass inspection.

grumblegrumble rare car grumble grumble overnight parts from japan my ass grumble grumble hks usa gone grumble grumble

AW11 MR2 build - "Akemi" Part 18

6/29/11
called NAPA today. apparently the guy that does valve work was on vacation last week so they still haven't gotten to it.....yeah......so im more than slightly pissed.

7/1/11
just heard back from NAPA machine shop. all the valvetrain parts are in good shape and the valve job/resurfacing should be done tomorrow. I'll be picking it up on Tuesday!!!

7/5/11
the head came out SUPER clean. so shiny.....got a TON done today. will add deets later but toooooo tired now

7/6/11
ok the first thing I did was try to put in the ARP headstuds. started by blowing out the holes in the block with compressed air. most of the studs went in fine but two or three wouldn't go in all the way, so I ended up going to Sears and getting a tap set and chasing the threads which worked really well. Head went on (this is all very abbreviated by the way), and then cams went on, set everything to TDC, timing belt changed, got the exhaust mani on +heat shields, alt and AC brackets, alternator, intake mani, water outlet/bypass, fuel rail, fuel lines connected, EGR on.
issues encountered - biggest was the expected ARP headstud/distributor shaft clearance issue. I had to grind the mess out of the end of the dizzy shaft and it still BARELY fits. I MAY have to end up grinding more but for now I think it will be ok.
Tomorrow could possibly see the rest of the parts being assembled.

7/6/11
was making good progress today till it decided to monsoon for 15 min....just long enough for me to get everything put away >.<
fuck it....lunch break.

7/7/11
I got EVERYTHING installed today. literally. its all in. it ran for 5 seconds tonight. however it was making a HORRIBLE noise from the dizzy area so I'm gonna remove it again and keep grinding the shaft so it wont hit the head stud.
Tomorrow is oil change and coolant flush. and re-install engine lid/strut bar/scoop, etc. Then maybe it will be done.

except for a wash. the car is FILTHY

Quaife QSR came in.

today. SUCKED. so hard. got up, ground down the dizzy more to make it fit right. start it up and it STILL sounds like someone threw a rock into a garbage disposal. long story short, things get taken off and put back on and taken off a half a dozen times, crank pulley bolts back themselves out, water pump pulleys forget to be tightened and then end up needing to come back off anyway....timing belts have to be removed again....
turns out NAPA is great with machine work but SUCKS at adjusting valve clearances
the BGB says that on a cold engine the Intake valve tolerance is 0.15 - 0.25mm
Exhaust valve tolerance is 0.20 - 0.30 mm

here is a text diagram of what I found after corey lent me his handy dandy feeler gauges:

Exhaust
_____0.340__0.356__________0.330___0.381______0.315__0.330______0.406___0.457__________#4_____________________ #3_________________#2_________________#1
_____0.265__0.254__________0.229___0.279______0.254__0.229______0.254___0.178
Intake

7/10/11
went to Toyota this morning with a box of doughnuts to give to the two parts guys that have been helpin me out. turns out its a different guy that works weekends...anyway long story short he was grateful for the doughnuts and ended up turning the $13.50/shim into $6/shim with his employee discount. for. the. win.

7/15/11
ok I think i figured out why I could not get the timing belt lined up.....I was putting it on the wrong mark for TDC
I was putting it on the middle ish one.

DERP


well now its all back together but it still feels/sounds like the dizzy is still off a tooth.....also I think one or two of the intake valves is out of adjustment....still really loud in a few spots, but definitely better than before

8/3/11
after checking and fine-tuning valve clearances at least 5 times, the valvetrain is still SUPER loud......and the car can't sustain idle....but i think that one is because the dizzy may be off a tooth again....

..................
just checked clearances again. everything was within spec, but just for sanity's sake I changed some to be more towards the middle or tighter end of the spec range. Sounds a bit WORSE now.....I'm seriously thinking about just giving up and limping the car to Toyota and throw my nonexistant money at them to make them do it

8/6/11
The MR2 is alive! runs and drives! needs a front end alignment but other than that....it's pretty sweet!

8/7/11
timing belt tensioner was not tensioning, so the timing belt was flapping around inside the plastic covers.

8/9/11
I really need to reflush the cooling system. I may do that tomorrow...may not. I do know the alignment shop gave me positive camber today, not negative, so I'm going back tomorrow to make them fix it

I kinda tweaked the TRD specs.....I asked for -1.5* instead of just -1* and 1/16 toe in instead of 1/8

Alignment done. Techs = awesome. Desk Jockey's = super lame.

8/12/11
ordered 949Racing lug nuts. the ones I'm currently using are pretty crappy quality and tend to bend and crack.

8/19/11
someone on MR2OC put these together and sold them as kits. bought it because it will fix my squeaky clutch pedal once and for all.
"--> billet aluminim constriuction
--> roller bearings so no more wear!
--> solid so no more clevis dampener wearing, bending or breaking
--> totally eliminates the clutch pedal squeak from worn components
--> slightly longer for that extra bit of adjustment
--> threaded all the way through for maximum adjustment possibilities
--> fits MK1 and MK2 (not sure about MK3)
--> MADE IN THE USA!!!"
http://i303.photobucket.com/albums/nn146/garagecrw/03232011523.jpg
http://i303.photobucket.com/albums/nn146/garagecrw/03232011524.jpg
http://i303.photobucket.com/albums/nn146/garagecrw/04102011564.jpg
http://i303.photobucket.com/albums/nn146/garagecrw/04102011565.jpg
"** modification of the clutch pedal is required to fit the clutch pedal roller bearing. drill bit size to use is either 31/64" or 15/32" either will work but the 31/64" is a little more precise"

gonna put it on tomorrow.

8/19/11
whelp found why my clutch was squeaking. the pin that connects the pedal to the master cylinder rod looked like this
this had also elongated the hole in the pedel itself so it was making for a ton of slop movement.

so now my pedel feels smoother and much firmer. also my engagement point feels higher now because of the increase in accurate pedal feedback, so that means I'm probably due for a new clutch within a year or so....which will probably be done along with a Fidenza aluminum flywheel and ARP flywheel bolts

8/25/11
so the conical end on the 949Racing lug nuts is too big for the holes in my wheels. $55 down the drain...can't use em. SO pissed right now


Sunday, June 26, 2011

AW11 MR2 Build - "Akemi" Part 17

6/7/11
New water pump is inIt looks like my pistons are burned or something.....or like one part of them is not dirty. What does this mean?
Piston #1


Piston #2

Piston #3

Piston #4

6/9/11
Because things are taking so damn long I'm probably going to end up taking it to NAPA machine shop up on Chamberlayne. Dude said it would be like $270 for milling and valve job and would take like a week

6/15/11
all parts are in. took the head to the machine shop today only to learn that i had left the cams on they can adjust the valves for me.....I thought I was gonna have to do that myself.

anyways so I brought it back home and put the cams back on and I'm taking it back tomorrow

6/16/11
got my HellaFunctional sticker in today :D

AW11 MR2 Build - "Akemi" Part 16

5/19/11
GOD I am like twitching i cant freaking wait to get started on this HG.....I'm gonna go to Dicks or something tomorrow and get an EZ up so I can say FUCK YOU to mother nature and work on it even in the rain. Still need a 12mm and 10mm twelve point deep sockets though AND I need to call the Head Shop in VA beach and see how much it would cost to make sure the head is flat and how much it is to do a valve job

5/21/11
it has begun. pix tomorrow. if you want to follow my progress, you can download the BGB at opc.mr2oc.com
basically today I drained coolant, unplugged everything that can possably be unplugged (engine harness), dropped AC compressor, disconnected alternator, removed engine lid, battery, intercooler, strut bar, belts, some coolant hoses, vacuum lines, water pump pulley, and misc other stuff. tomorrow the throttle body/SC inlet assembly will come out and probably the supercharger too.

also picked up a caliper (for measuring shims later), a torque wrench, and 12 point deep sockets (10mm &12mm).

5/22/11
still no pics yet. but I got the throttle body/sc inlet, supercharger, fuel rail, vacuum stuff, wiring harness, and intake manifold, alternator, and AC bracket off. broke a plastic vacuum port on the supercharger VSV >.<
later will be alternator bracket, exhaust manifold, and who knows what else.
most bolts are going back where they came from, but what I remove I bag&tag. also vacuum lines are tagged

5/24/11
PICTURES!!


Today I got the alternator bracket and AC brackets off, as well as the distributor, exhaust manifold, cam covers, cam gears, and the intake cam.
The exhaust manifold was only being held on by 3/5 bolts. the one on the far right was backed out and the one on the far left was missing. Also, there is supposed to be a support bracket at the bottom of the manifold that connects to the block to reduce stress on the manifold......yeah that's not there so its literally 2 exhaust hangers and the manifold on the head that is holding my exhaust up. awesome.
wasn't planning on pulling the crank pulley but i couldnt get to the timing belt tensioner without removing the cover...and because my crank pulley is oversize there wasnt enough clearence to get it off so I had to remove it.
tomorrow will be the exhaust cam and hopefully the head will come off.


5/24/11
brand new exhaust manifold from Toyota is $208 + shipping......not horrible.
part number 1714116190


5/24/11
head is off.


As it sits now
5/25/11
ordered valve seals and exhaust manifold tonight.

Monday, May 16, 2011

AW11 MR2 Build - "Akemi" Part 15

4/5/11
New issue of Modified....look who is on the last page!!
4/7/11
OK here we go
exhaust off. funny story....forgot to unplug the (brand new) o2 sensor when I dropped it (onto myself so it didnt fall too far to put stress on the wire thankfully) so I had to like rotate myself under this (very very heavy) exhaust to get to it. that was fun


gasket looks faaaaantastic. glad I got new ones for when I do my headgasket!


flywheel cover off


oil cooler line off

oil cooler line tied up out of the way
oil pan off

oil baffle and pickup

oil pickup/strainer

behold my crankshaft!

2222 = bearing numbers for rod bearings from the factory (supposedly)

33332 = main bearing numbers from the factory (supposedly)

rod bearing #1 = 2

rod bearing #2 = 2

rod bearing #3 = 4. this is different from the numbers on the block, meaning this one has probably been changed at some point

rod bearing #4 = 2

after i tried wiggling stuff around I couldn't see any noticable play in any of them. since it started to get dark, I put the oil pan back on with just 4 bolts to just hold it there so crap doesnt get up in my bottom end till i work on it again this weekend.

4/8/11
started it up for a sec while the exhaust was off earlier today

4/9/11
I got the rod ends and bearings out. All of them say the number 3 on the flat side. Also, the crank is super shiny and smooth, no scratches or anything. Bearings dont really have any scratching either, but the top ones (the ones in the rod) look like they have some wear in the middle. Once I figure out if the "3" really is the size I need, I will order the new bearings. Hopefully everything will be back together next weekendCylinder 1 - most of them look like this more or less. very clean, not gouged or anything.


this is the only marking on the bearings themselves

number on the side. all of them say 3

super clean crank journals

Cylinder 1 - notice one 12-point and one 6-point nut....very weird. will probably have to order another 12 point from Toyota so they are all the same

Cylinder 2

Cylinder 3

Cylinder 4
4/10/11sent the bearings with Pierce so he can measure them so I can have an idea as to what size I need to be looking at.

4/11/11

MR2_FTW wrote:

2222 = bearing numbers for rod bearings from the factory

te51levin wrote:
Those numbers have nothing to do with the rod bearings. I suspect they indicate the standard piston size, though I couldn't find any solid evidence of that.

________________________________

killer_siller wrote:

NO! Those numbers cast into the end caps are not the numbers you're looking for. These will be stamped into one flat side of the rod big ends.

te51levin wrote:
Exactly right. Just as the BGB says. You (MR2_FTW) need to have that BGB handy and pay careful attention to it.

________________________________

MR2_FTW wrote:
number on the side. all of them say 3

te51levin wrote:
So the factory originally fitted size 3 bearings in all of those connecting rods.

________________________________

MR2_FTW wrote:

Yeah I know, I just don't know which ones to get....the 3 on the cap suggests I get #3's, but the block says 2's...

te51levin wrote:
Again, just to be clear, ignore the numbers stamped into block. They are NOT for the connecting rod bearings.

________________________________

MR2_FTW wrote:

..should I just get 2's and measure the clearence on those then get either 1's or 3's depending on the clearences?

te51levin wrote:
Get #3 bearings if the crank looks cherry and feels perfectly smooth and confirm the correct clearance with Plastigage.

________________________________

MR2_FTW wrote:

I sent my old bearings with my friend to measure at their least-worn spots so I can have a (vague) idea as to what they are supposed to be since no one knows...and the measurements dont really say much either way...

te51levin wrote:
Let's not worry about measuring bearing shell thickness. There is far too much room for error and misinterpretation there.

________________________________

mk1noob wrote:

Maybe it was just an exhaust leak from that one donut gasket? If you didnt have any metal shavings in the oil, plus those bearings dont look too bad......

te51levin wrote:
I'm with mk1noob here. Exhaust leaks and poor state of tune can make a very convincing clunk or knock sound on these cars.

4/20/11
good news
new bearings are in, oil pan stuff is sealed and on. still need to fill with oil, put exhaust back on, and start it up.

bad news
the chassis where my front motor mount mounts is cracking and starting to tear away. this is apparently common on AW11's because its a pretty weak point on teh chassis to be taking all the forces from the engine. Mine is just starting, but this is what could happen:


so I need someone to weld on some 1/8" steel like this

more examples of torn mounts and repairs

4/20/11
tonight I added copious amounts of JB Weld to my exhaust crack, found a great way to route a ground wire for the alternator, and filled the car w cheap oil (wal mart supertec is like $11 for 5 quarts) cuz im just gonna have to change it after 500 miles of breaking in the new bearings anyway. tomorrow night I'll add another layer of JB Weld and Friday I'll put the exhaust back on the car and hopefully start her up.

still need to find a place to do my engine mount

4/21/11
emailed Delta V and they referred me to the guys they use for building roll cages and stuff
http://www.goroadracing.com/

I sent Carlos an email and I'm hoping to hear back from him soon
____________________________________________________
ok i called him and he's gonna have a look at my pics tonight and gimme a call back tomorrow. I could take it in as early as Monday!

also my Urethane kit came in from McMaster. 60A urethane base and activator so I can fill my side mounts at some point as well. FOR THE WIN

4/24/11
car runs smooth with no problems. even drove it to Billy's house. Still not heard back from Carlos about the welding

4/25/11
forgot my camera AND left my phone in my car (it was on the lift) so i have no pics of the torn mount, but it was getting worse. I'll take pics of the repair tomorrow probably, since I have to be under there to put under coating on it anyway. So tomorrow morning I'm gonna go bright and early to get an inspection and then I gotta do said underbody coating and put the plastic undertray back on and wash the car then it's good to go.

4/26/11


pics are before I added the rubber undercoating.

4/28/11
need front tires to pass inspection. ordered two Dunlop Direzza DZ101 205/50/15 from TireRack.....so I will be driving an expired inspection for a few days >.<

5/2/11
Front tires just came in. Dunlop Direzza DZ101 205/50/15. Treadwear 300, directional, summer tires. I decided on these because (1) its summer (2) they will probably help get rid of my understeer at autocross (4) the Kumho's have gone up in price by like $10/tire so these are now cheaper AND better

also I've never had 205's on the front before so this will be interesting.

5/5/11
put the stock shift lever back in, kept the drop plate. Got tired of notcheyness/tearing up center console.
________________________________________________
took a drive on Old Gun this afternoon. My new 205's up front rub on the plastic fender liners very slightly when I hit a bump in the middle of a turn. I don't think its a big deal since its not the metal of the fender, and its only under that instance, but I think my shocks play a big roll in that. I already know my Tokico Blues are woefully inadequate to properly dampen the TRD springs, so maybe better shocks can become a higher priority.